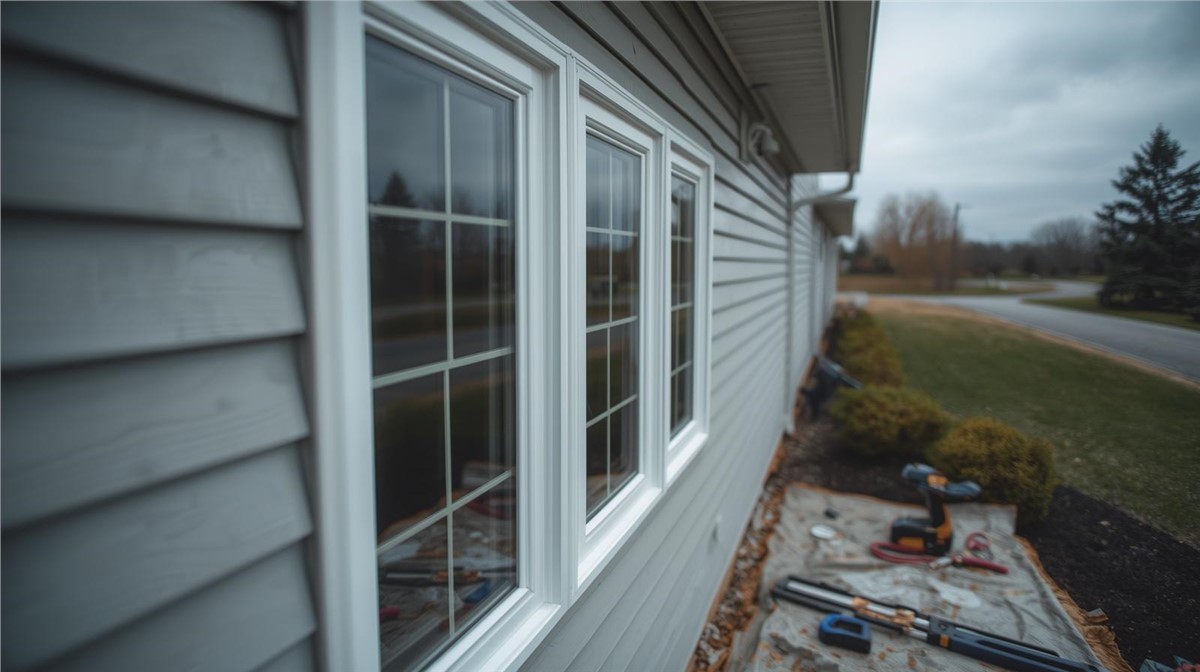
New windows can make a big difference in how your home looks and feels. They can reduce drafts, improve natural light, update curb appeal, and help protect your home from wind, rain, snow, ice, and seasonal temperature changes.
For homeowners in Lena, IL, window installation should be planned with local weather and exterior conditions in mind. Midwest homes face heavy rain, strong wind, hail, snow, ice, and freeze-thaw cycles, so the window itself and the installation details both matter.
A little preparation before the project starts can help the installation process move more smoothly.
Why Preparation Matters
Window installation is not only about removing old windows and putting in new ones. The contractor may need to inspect the opening, trim, flashing, insulation, siding, and interior finish around each window.
Good preparation helps with:
- Safer work areas
- Faster access to windows
- Better protection for furniture and belongings
- Clear communication
- Fewer surprises during installation
- Better long-term window performance
If hidden damage is found around the window opening, the project may need extra repair work before the new window can be installed correctly.
Step 1: Review Which Windows Need Replacement
Before installation, decide which windows are part of the project. Some homeowners replace every window at once, while others start with the most damaged or drafty areas.
Common signs you may need new windows include:
- Drafts around closed windows
- Fog or condensation between panes
- Windows that are hard to open or lock
- Cracked glass
- Soft or rotted trim
- Water stains around the opening
- Peeling paint near windows
- Warped frames
- Rooms that feel too hot or cold
- Storm-damaged screens or glass
A professional inspection can help confirm whether repair or replacement makes more sense.
Step 2: Choose the Right Window Style
Different window styles work better in different rooms. Before installation, homeowners should review style, function, and appearance.
Common options include:
- Double-hung windows
- Casement windows
- Sliding windows
- Picture windows
- Awning windows
- Bay or bow windows
- Specialty-shaped windows
Think about ventilation, natural light, privacy, cleaning needs, and how each window will look from the outside.
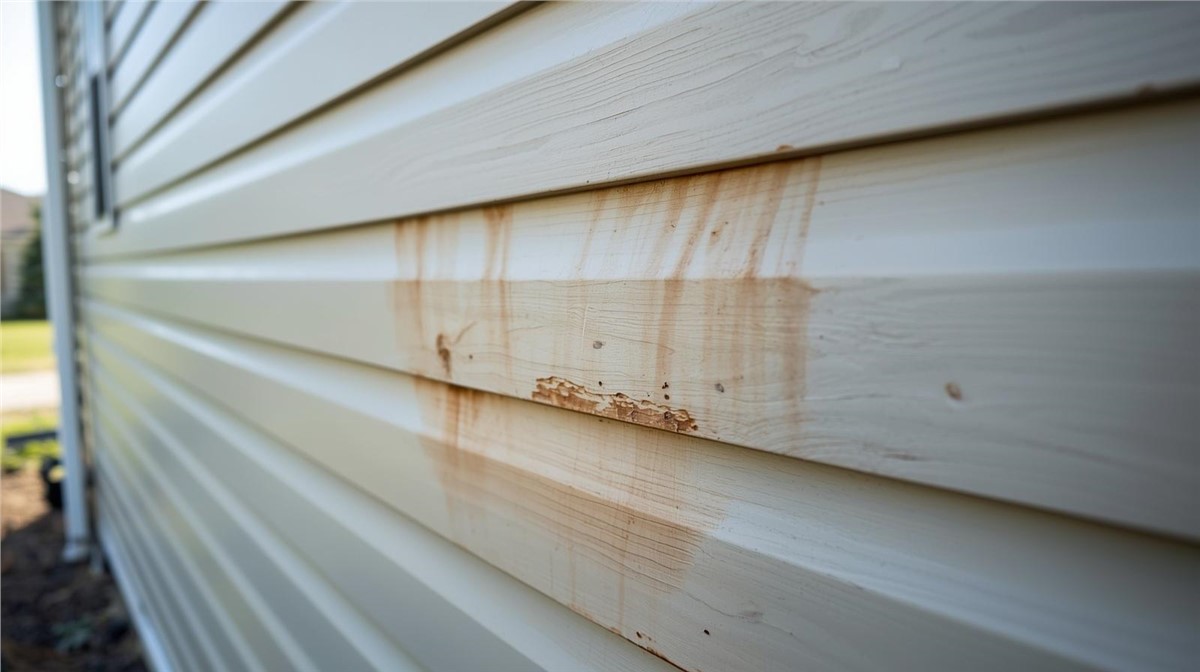
Step 3: Check for Moisture Around Existing Windows
Moisture damage should be addressed before new windows are installed. If water has entered around the old window, the surrounding materials may need repair.
Watch for:
- Soft trim
- Stained drywall
- Bubbling paint
- Musty odors
- Damp window sills
- Mold or mildew near the frame
- Exterior siding stains
- Rot around window trim
A leak near a window may not be caused by the window alone. Gutters, siding, flashing, roof edges, and trim may also be involved.
Step 4: Prepare the Inside of Your Home
Installers need clear access to each window from inside the home. Clearing the area helps protect your belongings and keeps the project moving.
Before installation, homeowners should:
- Move furniture away from windows
- Remove curtains, blinds, or shades
- Take down wall decor near windows
- Clear items from window sills
- Move fragile items from nearby shelves
- Protect valuables in work areas
- Keep pets in a safe room
- Make sure children stay away from work zones
Window installation can create noise, dust, and movement, so indoor preparation is important.
Step 5: Prepare the Outside of Your Home
Exterior access is just as important. Crews may need space for ladders, tools, materials, and cleanup.
Outside preparation may include:
- Moving patio furniture
- Clearing planters and outdoor decor
- Trimming shrubs near windows
- Unlocking gates
- Moving vehicles away from work areas
- Clearing hoses, tools, and yard items
- Providing access to exterior outlets if needed
A clear exterior work area helps installers work safely and efficiently.
Step 6: Plan Around Weather
Weather can affect window installation. Heavy rain, strong wind, snow, ice, or extreme cold may delay work for safety and quality reasons.
In Lena, IL, homeowners should consider:
- Spring rain
- Summer storms
- Hail risk
- Fall temperature changes
- Winter snow and ice
- Freeze-thaw cycles
If your existing windows are leaking or storm-damaged, repairs may need to be prioritized before the next round of severe weather.
Step 7: Ask About Installation Details
Installation quality is just as important as the window product. Even a good window can perform poorly if it is not sealed and flashed correctly.
Ask about:
- Proper measurements
- Insulation around the opening
- Flashing details
- Exterior sealing
- Interior finishing
- Trim condition
- Siding transitions
- Cleanup process
These details help reduce drafts, leaks, and moisture problems after installation.
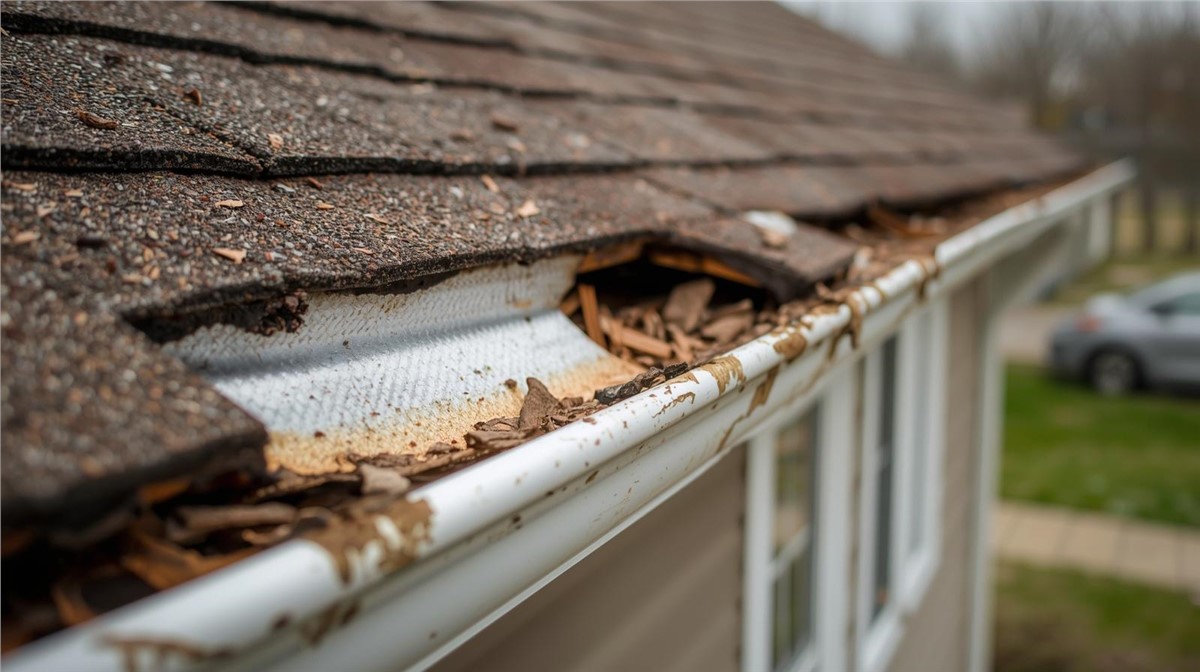
Windows and the Full Exterior System
Windows work with the rest of your home’s exterior. Roofing, siding, gutters, trim, fascia, soffit, and drainage all affect how well windows perform.
Before or during window installation, it is smart to check:
- Siding around window openings
- Exterior trim
- Gutters and downspouts
- Roof edges
- Flashing
- Interior moisture signs
- Storm damage areas
Huskie Exteriors provides roofing, siding, window, gutter, and storm damage restoration services, helping homeowners evaluate the full exterior system.
Repair vs Replacement
Window repair may be enough when the problem is small and the window is still in good condition overall.
Repair may make sense if:
- A screen is torn
- Caulking needs replacement
- One latch or lock is damaged
- Weatherstripping is worn
- The frame and glass are still performing well
Replacement may be better if:
- Multiple windows are drafty
- Glass seals have failed
- Frames are damaged or warped
- Windows are hard to operate
- Water damage is present
- Comfort problems keep returning
- The windows are outdated throughout the home
A professional inspection can help determine the best option.
What to Expect During Installation
During installation, the old window is removed, the opening is checked, repairs are made if needed, and the new window is installed, insulated, sealed, and finished.
The contractor may also check trim, siding, and moisture concerns around the opening. After installation, the work area should be cleaned and the completed window should be reviewed.
Homeowners should make sure each window opens, closes, locks, and looks finished before the project is complete.
Why Local Exterior Experience Matters
A local contractor understands how northern Illinois weather affects windows and exterior materials. In Lena, IL, windows need to handle wind, heavy rain, hail, snow, ice, and freeze-thaw cycles.
Local experience also helps homeowners identify whether window issues are caused by old windows, poor sealing, siding damage, gutter overflow, or storm damage.
Conclusion
Home window installation in Lena, IL is easier when homeowners prepare ahead of time. Clearing indoor and outdoor areas, checking for moisture, reviewing window styles, and understanding installation details can help create a smoother project.
If your windows are drafty, leaking, foggy, damaged, or difficult to use, Huskie Exteriors can inspect your home and recommend the right next step.
Contact Huskie Exteriors for professional roofing, siding, window, gutter, and storm damage services in Illinois and Wisconsin.
Subscribe to Huskie Exteriors's Blog


Comments