
Wisconsin, we made it. The snow is melting and the sun feels warm again. But as the ice disappears, it often reveals the silent toll a harsh winter takes on our homes. That peeling paint or small drip from a gutter isn't just a cosmetic issue; it’s a warning sign. The most expensive damage isn't from the snow you shoveled—it's the slow, hidden destruction from the freeze-thaw cycle that you can only spot in the spring.
To begin, borrow a simple method from professional inspectors: a top-down inspection. Just as water flows down your house, your check-up should too, starting with the roof and working your way to the foundation. This approach turns an overwhelming task into a logical plan, ensuring you don't miss any critical areas.
According to home improvement experts, catching a small issue like a loose shingle or cracked caulk in April can prevent thousands of dollars in water damage and structural repairs down the road. This Spring Exterior Home Maintenance Checklist for Wisconsin is your simple roadmap to finding and fixing those small problems, giving you peace of mind and protecting your biggest investment for the seasons ahead.
How to Inspect Your Roof for Winter Damage (Safely from the Ground)
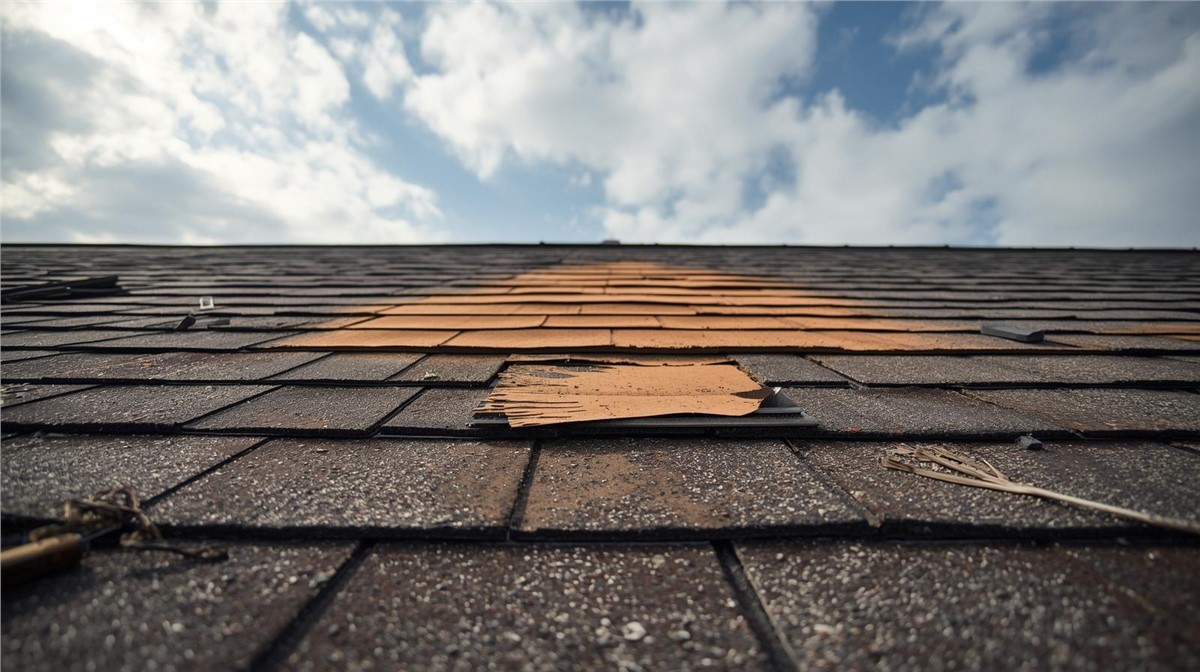
After a long Wisconsin winter, your roof has taken a beating from heavy snow, ice, and wind. You don’t need to climb a ladder to spot the most common problems. A quick walk around your house with a pair of binoculars is the safest way to prevent small issues from becoming expensive leaks.
From the ground, here are the three biggest signs of winter damage to look for:
Curled, Cracked, or Missing Shingles: Winter winds are notorious for lifting shingles, while the freeze-thaw cycle can cause them to crack. Look for any shingles that are out of place or patches where they're gone completely.
Dark Stains Under the Roof Overhang: Pay close attention to the underside of the roof's edge. This area, called the soffit, will show water stains or peeling paint if you had an ice dam—a ridge of ice that forced melting snow backward under your shingles. Inspecting your roof for ice dam damage now can save your attic from rot.
Loose Metal Strips: Check the metal pieces around your chimney, vents, and where different roof sections meet. This material, called flashing, seals these vulnerable joints. If you see any that are bent, loose, or pulling away, that’s a direct path for water to get in.
Finding a single damaged shingle might be a minor issue, but if you spot large areas of damage, significant staining on your soffits, or any loose flashing, it’s time to call a professional roofer. These problems are often caused by water having nowhere to go, which brings us directly to your home's critical drainage system.
Why Clogged Gutters Are a Wisconsin Home's Worst Enemy
Clogged gutters are often the source of serious water problems. Their job is to perform water diversion: collecting rain and moving it safely away from your house. But after a winter of collecting leaves, twigs, and shingle grit, they get clogged. Instead of flowing away, water spills over the edge, constantly soaking the wood trim the gutter is mounted to (the fascia board), causing it to rot. Even worse, that overflow saturates the ground right next to your home, which can lead to new foundation cracks from frost heave when the water re-freezes.
Cleaning gutters and downspouts is a critical spring task. From a sturdy ladder, wear gloves and scoop out the gunk. Once the main channel is clear, use a garden hose to flush the downspouts. If water backs up, you have a clog. A plumber’s snake can often clear it, but for stubborn blockages, it's safer to call a pro. While you're up there, look for any loose or sagging sections that need re-securing.
With the debris gone, run your hose at the far end of the gutter. The water should run cleanly toward the downspout and exit at least five feet away from your foundation. If you see it dripping or leaking from seams, you can seal them with a gutter-specific sealant from any hardware store. A clean, functional gutter system is your home’s best defense against water damage.
Power Washing vs. Soft Washing: What's Best for Your Siding?
During your exterior home inspection, you’ll likely notice dirty siding, especially on the north side of your house. Look closely at those green or black streaks. That isn't just dirt; it’s living algae, mold, and mildew that thrives in damp, shady conditions. If left unchecked, this organic growth holds moisture against your home, eventually staining and damaging your siding and paint.
You might be tempted to rent a powerful pressure washer, but resist this urge. High-pressure washing can be a costly mistake, as it can easily strip paint, gouge wood, or crack vinyl. Even worse, the intense spray can force water up and behind your siding panels, trapping moisture inside your walls where it can cause hidden rot and mold—the very problems you’re trying to prevent. It can ruin even the best exterior paint for Midwest weather.
Instead, the solution for algae and mold is a technique called soft washing. Professionals use specific, eco-friendly cleaners to kill the growth at its root, then rinse it all away with low pressure, equivalent to a strong garden hose. This cleans the surface without risking any damage. For simple mud or dirt, a gentle rinse is often enough. While you’re examining the siding, it’s the perfect time to also check for any gaps or cracks that need attention.
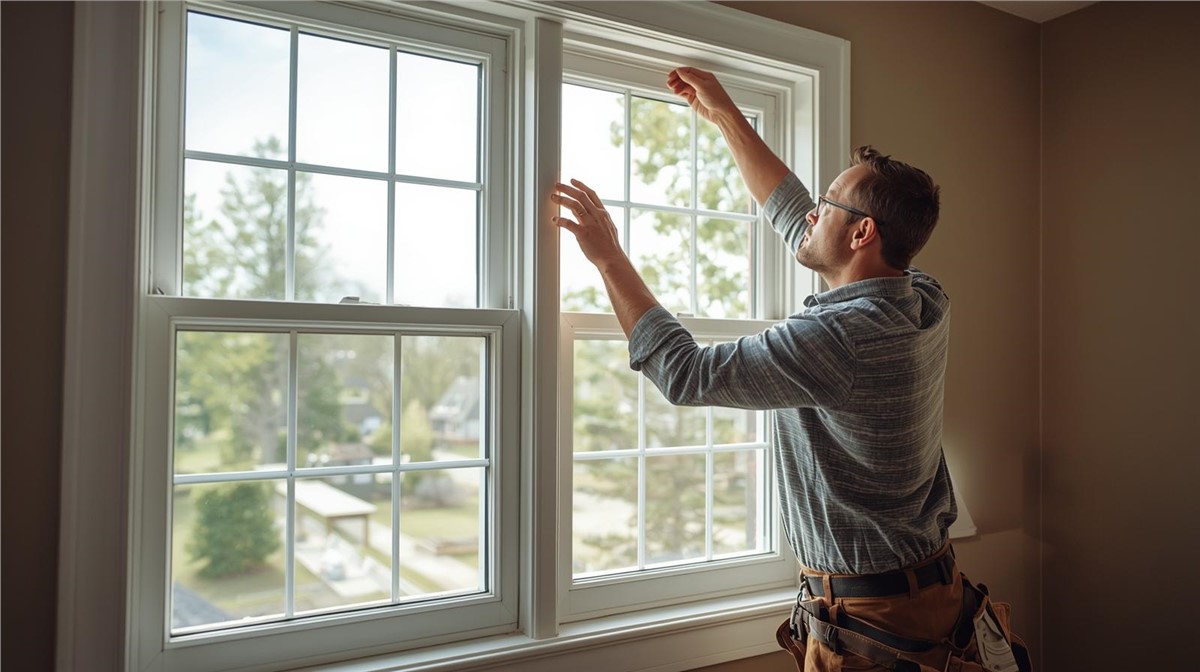
Finding and Sealing the Drafts That Survived Winter
Gaps you might have noticed while inspecting your siding often lead straight inside, creating drafts that made your furnace work overtime all winter. To find these hidden air leaks, try a simple trick: on a calm day, carefully move a lit stick of incense around the inside edges of your windows and doors. If the smoke trail wavers or gets pulled, you’ve found a draft. This simple test effectively pinpoints where your home is losing heat.
Once you’ve pinpointed a drafty spot, take a look outside. Check the seal, or exterior caulk, around the window and door frames. Is it cracked, brittle, or pulling away from the siding? That’s a clear sign it failed during winter’s freeze-thaw cycles. Also, check the flexible rubber or foam seals on the doors themselves, known as weatherstripping, to ensure they aren't compressed or torn. These materials are your home’s first line of defense against drafts and moisture.
Sealing these gaps is one of the best returns on investment for any homeowner. A tube of exterior caulk costs very little but can save you a noticeable amount on your energy bills year after year. By stopping that air exchange, you also block a path for moisture and insects to get in. But gaps around windows aren’t the only ones to worry about after a harsh winter.
What to Do About Foundation Cracks After a Winter Frost Heave
Winter’s deep freeze does more than just chill the air; it can physically lift and shift the ground around your home. This process, called frost heave, puts immense pressure on your foundation, often leaving hairline cracks in its wake. Before you panic, take a close look. Most small, vertical cracks are normal, but a good rule of thumb is the pencil test. If a crack in your concrete foundation is wide enough to fit the tip of a pencil into, it's a sign of potential structural movement that warrants a call to a foundation specialist.
Beyond the cracks themselves, examine the ground touching your foundation. Pay close attention to the grading, which is the slope of your yard. Does it direct water away from the house? It absolutely should. After a winter of heaving and thawing, you might find new low spots where snowmelt and spring rain can pool. A puddle sitting against your foundation is a basement leak waiting to happen, so building up these low spots with packed soil to restore a gentle slope is a crucial preventative step.
You may also spot a different kind of damage, especially on concrete steps or exposed foundation corners. If the surface of the concrete looks like it's flaking or crumbling, you’re seeing spalling. This is a direct result of water penetrating the concrete, freezing, expanding, and popping the surface off—a process often accelerated by winter de-icing salts.
Repairing Driveway and Walkway Cracks from the Freeze-Thaw Cycle
The same punishing cycle of freezing and thawing is especially hard on asphalt driveways and concrete walkways. A tiny crack is an open invitation for water to seep in. When that water freezes, it expands with incredible force, widening the crack. Come spring, you have a bigger problem. Sealing these small entry points now is crucial because a hairline crack this year can easily become a gaping pothole by next winter.
Tackling these minor cracks is a simple and satisfying DIY task. The key to a lasting fix is to clean the crack thoroughly first. Use a screwdriver to scrape out any old weeds or debris, then follow up with a stiff brush or a leaf blower to get it completely clean. Once it’s dry, apply a flexible asphalt crack filler from any hardware store. You’re creating a waterproof seal that stops the damage from spreading.
But what if your driveway looks less like it has a few cracks and more like a spiderweb? Widespread, interconnected cracks, often called "alligator cracking," signal a deeper issue. This, along with large, sunken sections, usually means the gravel base beneath your driveway has failed. At this point, a simple filler won’t solve the problem, and it's time to call a professional for a quote on resurfacing.
Preparing a Wood Deck for a Worry-Free Wisconsin Summer
Your deck is the star of the summer, but a winter's worth of snow and ice can leave it weak. Before planning your first cookout, it’s essential to check for wood rot, especially on stair treads and support posts. Grab a screwdriver and gently poke any suspicious spots that look dark or feel soft. If the screwdriver sinks in easily with little resistance, that’s a clear sign of rot that needs to be repaired or replaced before it becomes a safety hazard.
Once you know the structure is sound, check the surface. Does your deck need a new coat of sealant? An easy way to tell is the water bead test. Simply splash a little water on the boards. If the water beads up like on a freshly waxed car, your sealant is still doing its job. However, if the water soaks in and darkens the wood, it’s a signal that the protective barrier is gone, and it's time to reseal before summer sun and rain cause more damage.
If your deck needs a new finish, don't skip the most important step: a thorough cleaning. Any dirt, mildew, or old, flaky sealant will prevent the new coat from sticking, causing it to fail in just a few months. A good scrub with a deck cleaner creates a fresh surface, ensuring your investment in a quality sealant—one formulated for tough Midwest weather—adheres properly and provides lasting protection.
The 3-Step Check for Outdoor Faucets, Sprinklers, and Your A/C Unit
Turning on your outdoor faucets after a long freeze requires a specific, safe sequence to prevent a burst pipe inside a wall. First, make sure the outdoor spigot is closed. Then, go inside and slowly open the interior shut-off valve that supplies it. Listen carefully for any hissing or the sound of running water. If you hear anything, shut the valve off immediately—you have a leak. If it’s silent, you can safely go back outside and use your hose.
For homeowners with in-ground sprinkler systems, spring start-up is a job best left to the professionals. Winter's freeze-thaw cycles can easily crack underground lines or damage sprinkler heads in ways you can't see. Firing up the system yourself could miss these issues, leading to wasted water and costly landscape repairs. Schedule a professional service for after the last hard frost, which in most of Wisconsin is typically late April or early May.
Before summer arrives, give your outdoor air conditioning unit some attention. Over the fall and winter, the metal fins on the sides of the unit get clogged with leaves, dust, and cottonwood fluff, forcing your A/C to work harder and driving up your energy bills. After turning off the power at the breaker box, simply use a garden hose on a gentle setting to spray down the fins and wash the debris away. Never use a power washer, as the high pressure can easily bend the delicate metal. A few minutes of caution with these systems prevents expensive disasters and helps your equipment run efficiently, saving you money all season.
Your Spring Maintenance Game Plan: A Weekend's Work for a Year of Peace of Mind
Looking at your home after a long Wisconsin winter, you now have a clear path forward. You know exactly where to look for winter’s hidden damage, turning potential worry into a confident plan for seasonal home maintenance.
The full checklist can feel like a lot, so don't try to tackle it all at once. For the biggest impact and the most peace of mind, focus on this "Top 3" priority list first.
Your Top 3 Priorities:
Roof & Gutters: Water from above is the #1 enemy.
Foundation & Grading: Control water at ground level.
Windows & Doors: Seal your home’s envelope.
This isn't about chores; it's about protecting your family and your investment. Pick one sunny Saturday for the "Top 3," and tackle the rest the next. A little spring home care now means you can fire up the grill and relax all summer, knowing your home is secure.
Subscribe to Huskie Exteriors's Blog


Comments